Thursday, April 28, 2011

Photo Editing on a Budget Revisited

Getting good photos first is always best, but, if your images are a little less than perfect, there are several things you can do to improve them. Photo editing is a wonderful way to improve your images, even if they are not quite perfect.

Of course Photoshop is the best program to use, but it can be very expensive. Here is a link listing several free image editing programs and the pros and cons.

I always get my free software from downloads.com I find their rating system to be helpful and they are pretty safe. Although nothing is free, just make sure you have a good spyware and adware removal program running on your PC. Picnik Is also a great online editor for the novice.

Now that you have a photo editing program, play with it. Your less than perfect photo CAN be improved on. I always take my photos with a fairly high resolution. This will make a crisper picture. You can always reduce your resolution later.

Here is an example of an edited image:

The first picture is too light, not enough contrast and definition, and the composition could be more interesting.

First: adjust levels. Play with these settings until you get a look you like. This can add definition and contrast.

Second adjust brightness and contrast. In this case I would make darker and raise contrast.

Your photo editing program may not have a levels setting but they all have brightness and contrast.

Third step is color balance. Have your item in front of you and adjust the color on your screen to match what is in your hand. This will not be perfect, as all monitors do not have the same color settings. You can get complaints about your color, but it is impossible to have your color match every screen in the world. The best you can do is match yours and add a disclaimer on your site.

Once your photo is perfect, crop your image. Try a few different compositions, until you get the one that looks the most interesting and shows off your art. Remember, your first image is a teaser to make a buyer want to see more. Your remaining pictures should show your complete item with as much clear detail as possible.
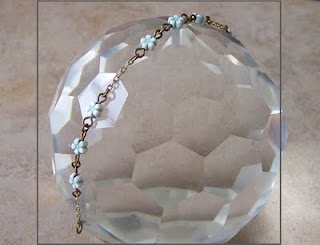
I take my pictures in a rectangular format that Etsy uses for Treasuries.  Try to imagine a square window. See example. This way you will have a nice composition in either the square or rectangular format.

Finally reduce your resolution to your sites specifications.

Now look at your pictures. Would you buy from this shop? Would you add these pictures to a treasury or collection? If yes, you have done a great job. Congrats!!!


Sunday, April 24, 2011

Easter Eggs

Such a late Easter this year, but I guess it goes along with Such a Late Spring. Sometimes Easter is in Early March and there are lots of flowers blooming. I remember one Spring where the kids in the neighborhood were playing on lawns covered with the early violets.

Easter is in Late April this year and the daffodils have barely bloomed, no violets yet here, no lilacs, and no garden planted yet.

But Easter is always full of Eggs - the Symbol for Rebirth. I made a collection at Artfire this morning. This one here. You can click on it to get a better view.

Later today we will be making my famous Deviled Eggs.  I'm going to share the secret with you all but you'll have to experiment to get it just right for yourself.

One year, I thought I'd make my Deviled Eggs a little lower in calorie, so I decided to add cornflakes and low fat mayo. The cornflakes would take the place of some of the yolk. They were out of this world. I also added liquid smoke to make them kind of like Bacon and Eggs. Now I use real mayo and stuff the eggs over filling.

So here's my secret, crushed cornflakes, mayo, liquid smoke, salt, and pepper. Mix well with the yolks, stuff the egg halves and sprinkle with a bit of good paprika. Here's my secret, you have to figure out the proportions yourself, but you won't be sorry you did. Happy Easter to those who celebrate and Happy Deviled Eggs to those that love them.

Thursday, April 21, 2011

Photo Tips on a Budget Revisited

Here are links to some great photo tips. elgarbo Etsy Forum Etsy Seller Merriweather Council
Artfire has a Photography guide But I think you can find better tips.

I have a few tips to add.

Your photography should be front page worthy. There should be enough contrast between setting and product to distinguish between them. Not necessarily a white or black backdrop. It can be something with character, a vintage table top, an old love letter, a slab of stone or wood. See Examples of Good Photography. Most sites display a square format, but Etsy for example uses a rectangle for Treasuries. Set up your picture so that the focus is within a center square. You can also do this with editing later. I will explain further in my next post. 

Star of the East                                         Shiny Adornments                                            Beau Monde


My first tip is don't do it yourself. What? Yes really! If you are not a pro, you can often get a student or fledgling photographer to take pictures for the exposure. Try local schools or listing on craigslist. You can find photographers and models (clothing, jewelry) at modelmayhem. Many will work for free or for product.

Second tip, if you must do it yourself - LIGHTING! Indirect, natural light is best. Don't use your camera's flash, It will create an artificial, 2 dimensional look and wash out your product. Best light is outside on a cloudy day or by a window. White Transparent film on the window helps to filter strong light. Another option is Halogen shop lights. I have seen some wonderful pictures taken with them. You will need two to distribute the light source. They can be pretty inexpensive. Make sure you keep an eye on them while working as they can get pretty hot.

You can also make a light box for jewelry and smaller items, like this one at wikiHow

Now that you have your layout and your light. What do you do with your camera? You can get decent pictures with just about any digital camera as long as the light and setup is good. MY digital camera was bought on eBay for $120, was $400 new. It is wonderful for the price.

Take time to play a little with the photography to get the right settings for your camera. You get better pictures if you can use your manual settings but, you can easily get good pictures with automatic settings too. Make sure your camera is set for the proper distance. A good trick for getting a bit of depth of field out of a less expensive camera is to focus on your merchandise, (this will usually be in the center of your item), move your camera so the focus is on the closest part of the item, then shoot. Take a lot of pictures, you will never be wasting time if your merchandise sells.

Get a good picture and then on to photo editing. If your pictures are not perfect this is where they can be touched up. Tips on next weeks post!

Monday, April 11, 2011

The Garden Visitor

Yesterday I did a lot more work in the Veggie Garden. I finished turning over the soil, left it fluffy to dry, and turned in some more humus. I also put in some planters around the yard. I found an old Sap bucket without a bottom and an old Fire Station bucket without a bottom. Those will be great for planting. I love to contain oregano, but it likes to be deep rooted, so I'll put it in the Red Fire Station Bucket and the old ammo box which is really weather resistant, will hold my potted cilantro and basil. I can't wait. I'm going to look for some more cute planters to line the garden with, because that is the sunniest part of the yard, and it will look much cuter.

I also took the sap bucket and planted it in the ground and found a piece of terracotta drain pipe that I placed next to it. I put some sedum in the pipe, but not sure what I will put in the bucket. Doesn't get much sun so maybe impatiens will be nice there. I love to use that little sedum in pots too. It comes back every year and looks cute draping over the sides. If you buy vinca for you planters, you can take it out at the end of the year, roll it up and bury it underground, at least 6 inches.Then pull it up again in the spring. You don't have to buy it every year.

I know some Italians who love fresh figs so much that they do this with their fig trees. They don't weather will in Cleveland, but they have to be uprooted and buried a little deeper. It works though.

Now for my visitor. After all my hard work, I looked out of the window and saw a cheap tacky scarecrow in the corner of the garden. The property owner found it at a flea market for $1and added it to the garden. He was being nice, but I thought it was kind of tacky. Well I went out today to take his picture and I guess I found him a little charming, because I wasn't so upset when I took his picture. Maybe he will bless the crops at the back of the garden, where he won't block sunlight. Yeah, that's it.

I also found a clump of almost blooming Daffodils. So pretty. I bought a rose bush to plant in the beds this weekend too. I've been having problems with them. Who would believe. You can't get rid of roses when they establish, but trying to get them started is a chore. I planted one last year, too close to the dog run and she decided to dig it up. Nothing else, just the rose bush.

Hope you had a nice weekend too. It's raining today, so no more planting, but I'm looking forward to it again tomorrow.

Saturday, April 9, 2011

It's Daffodil Time

I finished turning more than half of the Garden, broke down the compost bin and moved it to a better location. I always leave it right in my garden, because the decomposing food and garden wastes work great to add nutrients to the soil. It's a great place to plant tomatoes around, but I think I'll plant them where the compost bin was last year.

Moving the bin was a little tricky, because I had to keep only the bottom, decomposed compost and had to move the fresher compost back to the bin. Our garden in on a hill, so I put the bin at the highest end, so nutrients will flow down in the rain. Smart huh? Last year was the first year, and I had to rush the garden, no time for real planning.

The garden is almost ready for planting, and if the clouds break, I plan on spending another lovely day out in it today. Maybe I will even get out my onion sets and plant my potatoes in the canvass bags. Lettuce and peas should be planted now too, but my beautiful big tomatoes and peppers will have to wait a few weeks.

We have crocus up and the daffodils are just about ready to pop. The lilac bush and Cherry tree have a long way to go though. Not like DC where the Cherry Blossom festival waits. Hope I get there some day.


I'm really excited about the flowers. We don't have a lot in the yard, but we have a few. I'm going to try to get a few more this year. There are a lot of perennials down at the lake and we are just a few yard walk away from it.

Hope you get a chance to work in the Garden today. It's a wonderful way to refresh and revitalize after the long dark Winter.

Thursday, April 7, 2011

Obsessed with Gardening

“The kiss of sun for pardon, The song of the birds for mirth, One is nearer God's Heart in a garden Than anywhere else on earth” 
Dorothy Frances Gurney

Last week I was obsessed with Totes, OK I still am. Totes and clutches. But with the warming weather, I'm growing an obsession with gardening too.

I've planted my seedlings and my Tomatoes, Peppers, and Basil are doing great. I needed some cilantro, so instead of buying a bunch, for about the some price I got a plant. I thought I can put it out soon. The cat's aren't too happy about this plant thing, because my seedlings are sitting on the table in front of the window that they usually sit on to watch the birds.

Today, if I get the energy and the sun is out as promised, I'm going to go out and pull up all the ground cloth, and turn over the garden. It's time to plant the cool weather seeds, the peas and lettuces and I can even start onions and potatoes. I used to plant potatoes in a plastic garbage can, that I drilled with holes for drainage and light. It worked well, but didn't make it here from NY.


This year I got a fantastic Idea I bought some coffee sacks last summer, that turned out to be much coarser and not printed with nice patterns, than I expected them to be. Very disappointing, but the auction listing did say bags can vary. I thought that those might be really great to grow the potatoes in. I did a little research and I'm not the only one to get that idea. Here is a link on how to make potato planters at Sustainable Eats. I think the bags will look really cute too. Here is a great link with other planter ideas.

I think I might take another bag and grow carrots in it too. Our soil is not wonderful and I can fill them with soil and humus mix so it's nice and soft for the roots to grow. Our soil is OK for peppers, zucchini and tomatoes, and in time the beans I plant will add vital nitrogen.

I'm a Garden fanatic, actually. I could go on about how and why you have to rotate tomatoes and what you need to plant by the beans and why garlic and marigolds are beneficial. I love the black plastic mulch, because I hate to weed, I prefer to spend my time harvesting. For years we've enjoyed rabbits as pets, because they not only are sweet and cuddly, but their droppings don't have to be composted for fertilizer. Just put their cage cleanings right on the garden.

Hope you all get out to the garden this summer. 

Friday, April 1, 2011

Obsessed with Totes

I've suddenly become obsessed with bags and totes. Poppy made some cute NKOTB clutches to sell on eBay and I want to make those so I ordered 100 zippers. That should be enough! I made a bunch of Totes that we will be listing soon too.


I also saw these great HUGE Beach Bags that MaidenJane has on her Etsy site. She has a Tutorial for them on Her Web Site. She is so awesome. I just had to make it. I tried it out of some polyester fabric I got really cheap from Walmart. Yes we still have fabric at our Walmart and we still have some for $1.50 a yard. 


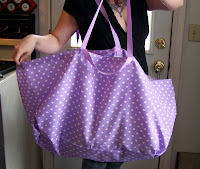
I made them with Grosgrain ribbon, because they match and I just felt like it. It turned out so cute.

Then I thought, wow, I just love Ikea bags, wonder if I can make a "cute" one of those. So I measured my Ikea bag and made my own pattern. I used the same material, because for some reason I thought I could use it for something and bought a lot of it. If you want to see the original click here "Ikea Bag" They are great and the best deal on anything for the price.


We use them for laundry, groceries, hauling packages to USPS, you could even pad it and put your baby in it for a soft cradle. They are durable and strong. But not always so cute. So here is my version. It has the double straps, short for grabbing and long for carrying on your shoulder. But I'd have to charge more that $.59 for it. I'm not Ikea after all.

My next project is a Purse. I'm going to start on it tomorrow, along with a lot more totes and clutches. I told you I was obsessed. I have some great fabric I picked up at Walmart. I'll let you know how everything turned out.
Related Posts Plugin for WordPress, Blogger...